No edit summary Tag: Source edit |
No edit summary Tag: Source edit |
||
| (2 intermediate revisions by the same user not shown) | |||
| Line 13: | Line 13: | ||
==Recommended Heroes== |
==Recommended Heroes== |
||
Attack on Titan heroes has an immense advantage against the Colossal Titan. Hero affinity advantage also applies which means HP-type heroes also have an edge against the boss. |
Attack on Titan heroes has an immense advantage against the Colossal Titan. Hero affinity advantage also applies which means HP-type heroes also have an edge against the boss. |
||
| + | |||
{| class="wikitable" style="text-align: center" |
{| class="wikitable" style="text-align: center" |
||
| |
| |
||
| Line 62: | Line 63: | ||
====All-Star Teams==== |
====All-Star Teams==== |
||
{| style="border: 1px solid black; width: 100%;" |
{| style="border: 1px solid black; width: 100%;" |
||
| + | ! width="12%" style="background: #260B06; border: 1px solid black;" | <font color=white>Team 1</font> |
||
! width="12%" style="background: #260B06; border: 1px solid black;" | [[File:Beren.png|link=Blue Eren|70x70px]] |
! width="12%" style="background: #260B06; border: 1px solid black;" | [[File:Beren.png|link=Blue Eren|70x70px]] |
||
! width="12%" style="background: #260B06; border: 1px solid black;" | [[File:Rlevi.png|link=Red Levi|70x70px]] |
! width="12%" style="background: #260B06; border: 1px solid black;" | [[File:Rlevi.png|link=Red Levi|70x70px]] |
||
| Line 69: | Line 71: | ||
{| style="border: 1px solid black; width: 100%;" |
{| style="border: 1px solid black; width: 100%;" |
||
| + | ! width="12%" style="background: #260B06; border: 1px solid black;" | <font color=white>Team 2</font> |
||
! width="12%" style="background: #260B06; border: 1px solid black;" | [[File:Geren.png|link=Green Eren|70x70px]] |
! width="12%" style="background: #260B06; border: 1px solid black;" | [[File:Geren.png|link=Green Eren|70x70px]] |
||
! width="12%" style="background: #260B06; border: 1px solid black;" | [[File:Rlevi.png|link=Red Levi|70x70px]] |
! width="12%" style="background: #260B06; border: 1px solid black;" | [[File:Rlevi.png|link=Red Levi|70x70px]] |
||
| Line 78: | Line 81: | ||
====F2P and Mid-Level Teams==== |
====F2P and Mid-Level Teams==== |
||
{| style="border: 1px solid black; width: 100%;" |
{| style="border: 1px solid black; width: 100%;" |
||
| + | ! width="12%" style="background: #260B06; border: 1px solid black;" | <font color=white>Team 1</font> |
||
! width="12%" style="background: #260B06; border: 1px solid black;" | [[File:Beren.png|link=Blue Eren|70x70px]] |
! width="12%" style="background: #260B06; border: 1px solid black;" | [[File:Beren.png|link=Blue Eren|70x70px]] |
||
! width="12%" style="background: #260B06; border: 1px solid black;" | [[File:Gescanor.png|link=Green Escanor|75x75px]] |
! width="12%" style="background: #260B06; border: 1px solid black;" | [[File:Gescanor.png|link=Green Escanor|75x75px]] |
||
| Line 85: | Line 89: | ||
{| style="border: 1px solid black; width: 100%;" |
{| style="border: 1px solid black; width: 100%;" |
||
| + | ! width="12%" style="background: #260B06; border: 1px solid black;" | <font color=white>Team 2</font> |
||
! width="12%" style="background: #260B06; border: 1px solid black;" | [[File:Beren.png|link=Blue Eren|70x70px]] |
! width="12%" style="background: #260B06; border: 1px solid black;" | [[File:Beren.png|link=Blue Eren|70x70px]] |
||
! width="12%" style="background: #260B06; border: 1px solid black;" | [[File:Gmeliodas.png|link=Green Meliodas|75x75px]] |
! width="12%" style="background: #260B06; border: 1px solid black;" | [[File:Gmeliodas.png|link=Green Meliodas|75x75px]] |
||
| Line 92: | Line 97: | ||
{| style="border: 1px solid black; width: 100%;" |
{| style="border: 1px solid black; width: 100%;" |
||
| + | ! width="12%" style="background: #260B06; border: 1px solid black;" | <font color=white>Team 3</font> |
||
! width="12%" style="background: #260B06; border: 1px solid black;" | [[File:Gmeliodas.png|link=Green Meliodas|75x75px]] |
! width="12%" style="background: #260B06; border: 1px solid black;" | [[File:Gmeliodas.png|link=Green Meliodas|75x75px]] |
||
! width="12%" style="background: #260B06; border: 1px solid black;" | [[File:Gescanor.png|link=Green Escanor|75x75px]] |
! width="12%" style="background: #260B06; border: 1px solid black;" | [[File:Gescanor.png|link=Green Escanor|75x75px]] |
||
| Line 99: | Line 105: | ||
{| style="border: 1px solid black; width: 100%;" |
{| style="border: 1px solid black; width: 100%;" |
||
| + | ! width="12%" style="background: #260B06; border: 1px solid black;" | <font color=white>Team 4</font> |
||
! width="12%" style="background: #260B06; border: 1px solid black;" | [[File:Gescanor.png|link=Green Escanor|75x75px]] |
! width="12%" style="background: #260B06; border: 1px solid black;" | [[File:Gescanor.png|link=Green Escanor|75x75px]] |
||
! width="12%" style="background: #260B06; border: 1px solid black;" | [[File:Gelizabeth.png|link=Green Princess Elizabeth|75x75px]] |
! width="12%" style="background: #260B06; border: 1px solid black;" | [[File:Gelizabeth.png|link=Green Princess Elizabeth|75x75px]] |
||
| Line 108: | Line 115: | ||
====Beginner-Friendly Teams==== |
====Beginner-Friendly Teams==== |
||
{| style="border: 1px solid black; width: 100%;" |
{| style="border: 1px solid black; width: 100%;" |
||
| + | ! width="12%" style="background: #260B06; border: 1px solid black;" | <font color=white>Team 1</font> |
||
! width="12%" style="background: #260B06; border: 1px solid black;" | [[File:Beren.png|link=Blue Eren|70x70px]] |
! width="12%" style="background: #260B06; border: 1px solid black;" | [[File:Beren.png|link=Blue Eren|70x70px]] |
||
! width="12%" style="background: #260B06; border: 1px solid black;" | [[File:Bmeliodas.png|link=Blue Meliodas|75x75px]] |
! width="12%" style="background: #260B06; border: 1px solid black;" | [[File:Bmeliodas.png|link=Blue Meliodas|75x75px]] |
||
| Line 115: | Line 123: | ||
{| style="border: 1px solid black; width: 100%;" |
{| style="border: 1px solid black; width: 100%;" |
||
| + | ! width="12%" style="background: #260B06; border: 1px solid black;" | <font color=white>Team 2</font> |
||
! width="12%" style="background: #260B06; border: 1px solid black;" | [[File:Beren.png|link=Blue Eren|70x70px]] |
! width="12%" style="background: #260B06; border: 1px solid black;" | [[File:Beren.png|link=Blue Eren|70x70px]] |
||
! width="12%" style="background: #260B06; border: 1px solid black;" | [[File:Gmeliodas.png|link=Green Meliodas|75x75px]] |
! width="12%" style="background: #260B06; border: 1px solid black;" | [[File:Gmeliodas.png|link=Green Meliodas|75x75px]] |
||
| Line 281: | Line 290: | ||
|- |
|- |
||
| colspan="2" |'''Normal''' |
| colspan="2" |'''Normal''' |
||
| − | | colspan="2" |Hard |
+ | | colspan="2" |'''Hard''' |
| − | | colspan="2" |Extreme |
+ | | colspan="2" |'''Extreme''' |
|- |
|- |
||
|1,200,000+ |
|1,200,000+ |
||
Revision as of 21:55, 25 July 2020
The Titan Conquest Event is one of the 3 playable contents for the 7DS x AoT collaboration event. It can be unlocked after clearing [The Colossal Titan Returns!] World Quest. In this event, up to 4 players can tag along and form teams to fight against the Colossal Titan.
Participants can gain Omni-Directional Mobility Device Fragments as rewards which can be exchanged for growth support items and limited-time AoT hero costumes in the Event Exchange Shop. Imperial Reports on Titans are needed to enter the Colossal Titan Quest and it can be farmed on Titan Elimination, Free Stages, SP Dungeon, Boss Battles, and Death Matches.
The event runs in a span of 2 weeks from July 21 to August 4, 2020.
Recommended Heroes
Attack on Titan heroes has an immense advantage against the Colossal Titan. Hero affinity advantage also applies which means HP-type heroes also have an edge against the boss.
| Damage Increase | Enemy Damage Decrease | |
| [Attack on Titan] Heroes | +300% | +80% |
| +30% | +20% |
Main Team Heroes

|

|

|

|

| |
|---|---|---|---|---|---|

|

|

|

|

|
Sub-slot Heroes

|

|

|

|

|

|
|---|
Team Recommendations
All-Star Teams
| Team 1 |
|
|
|
|
|---|
| Team 2 |
|
|
|
|
|---|
F2P and Mid-Level Teams
| Team 1 |
|
|
|
|
|---|
| Team 2 |
|
|
|
|---|
| Team 3 |
|
|
|
|
|---|
| Team 4 |
|
|
|
|---|
Beginner-Friendly Teams
| Team 1 |
|

|

|

|
|---|
| Team 2 |
|
|
|
|
|---|
Blue Eren: Best Hero Against the Colossal Titan!
Blue Eren is hands down the best hero for this event. His skill set is designed to wreck collaboration event bosses, similar to the previous Slime collaboration’s Blue Rimuru where he just owns the Ifrit boss. Amazingly, Blue Eren is given to us for free so you must take advantage of using him in this event. Hurry up and Evolve him to UR level 60 at the very least!
Skills
| Skill | Description |
| Now’s the Time! | Can inflict damage up to 500% of his Attack at rank 3. |
| I Will Succeed! | Increases basic stats and gains Evasion. Perfect for getting an attack boost before using his Ultimate. |
| Ultimate: I Will Wipe You Out! | Shatter damage ignores resistance. Inflicts damage up to 945% of his Attack at max level. |
How to Max-out Blue Eren’s Ultimate
You can max out Blue Eren’s Ultimate without purchasing any packs. Instead, work on beginner-friendly event missions to acquire duplicate coins and upgrade his ultimate. Blue Eren is the ideal hero to put up against the Colossal Titan in the Titan Conquest Event. Clearing this event will give you fragments used to exchange for cool items in the Exchange Shop (Growth support items and Limited-Time AoT hero costumes)
| Event / Mission | Condition |
| Check-In Event | Log-in to the game any time between the event period (7/21 - 8/3) |
| Special Mission | Finish all 5 AoT collab missions |
| Hawk Pass | Reach level 10 by completing Hawk’s missions |
| World Quest | Clear the entire World Quest |
| Titan Elimination Event | Destroy the Secret Base |
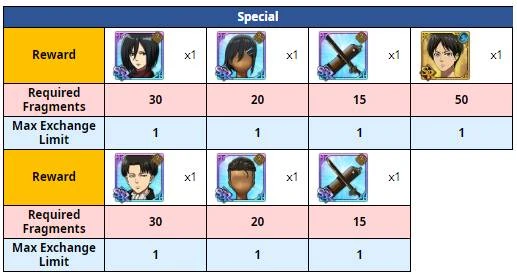
| Exchange Shop | Purchase with 50 Omni-directional Mobility Device Fragments |
Colossal Titan Info
| Normal | Hard | Extreme | |
| Level | 100 | 120 | 140 |
| Attribute | |||
| CC | 80,000 | 120,000 | 180,000 |
| Attack | 4,460 | 6,312 | 7,878 |
| Defense | 4,160 | 6,450 | 9,090 |
| HP | 2,407,500 | 3,810,000 | 5,512,500 |
Skills and Unique Abilities
- Immune to HP Decrease / HP-related Stats Decrease / Corrode.
- Immune to Stun / Petrify / Freeze / Coerce / Skill Disable.
- AoT heroes have their damage increased by 300% and incoming damage decrease by 80%.
- Increases damage taken from skills with an Amplify effect by 100%.
- Skill Effects: Disables Buff and Debuff skills, Removes Buff, Decreases Attack-related stats, Infect, Disables Unique Effects, Increases Damage Taken by all enemies, Increase Pierce Rate, Pierce, Disables Ultimate Moves
- Battle state may change depending on damage dealt by the boss and heroes. Each battle state inflicts different skill effects and after a certain number of turns, returns to the previous battle state.
Boss Mechanics and Strategy
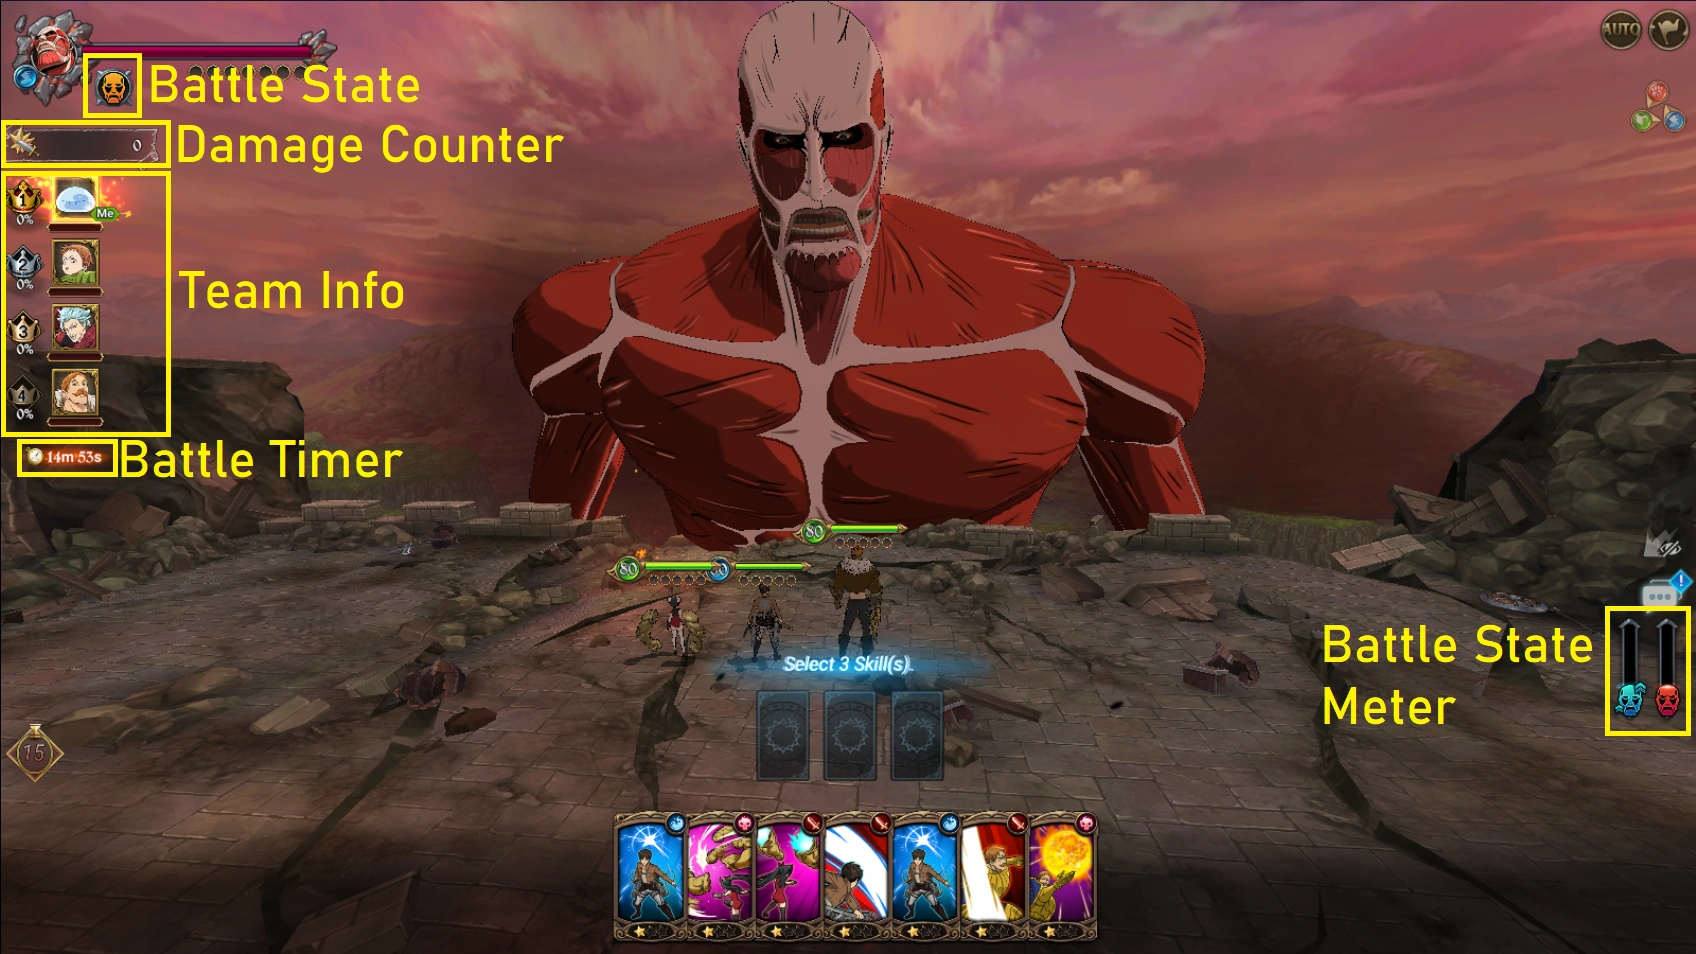
- Each difficulty has a time limit and you have to defeat the Colossal Titan before time runs out.
- Normal - 20 minutes
- Hard - 15 minutes
- Extreme - 10 minutes
- Rewards depend on the ranking and damage dealt. Do take note that rewards become smaller the fewer participants there are, so it is strongly advised to always run a 4-player party.
- Damage done by other players is added either at the end of your turn or the boss turn depending on the timing.
- The boss usually casts a disable buff on Blue Eren, you’ll have a small window to cast your buff so take advantage of using it when available.
- One of the boss’ ultimate can disable your team from using ultimate moves so make sure to use them immediately when ready. This also helps you to achieve a higher ranking if you can deliver good amounts of ultimate move damage throughout the duration of the battle.
- Notable support heroes: Green Princess Elizabeth, Green Merlin, Red Elizabeth, Green Jillian
- Notable damage increasing debuffs: Ignite, Bleed
- Green Meliodas users can use his counter skill when his HP falls below 50%. Supports can then use healing skills to bring his HP back up.
- Full AoT team (Blue Eren/Green Eren, Red Levi, Blue Mikasa) is the best and most effective team because of their inherent advantage against the Colossal Titan. However, just having a Blue Eren surrounded by HP-type heroes is more than enough to do well in this event.
Rewards and Exchange Shop
Rewards are distributed by ranking and damage dealt. Use the Omni-directional Mobility Device Fragments to buy growth, equipment, and special items in the Exchange Shop.
| Place Reward | |||
| Normal | Hard | Extreme | |
| 1st | 10 | 20 | 30 |
| 2nd | 5 | 10 | 15 |
| 3rd | 3 | 5 | 7 |
| 4th | 2 | 3 | 4 |
| Annihilated | 1 | 2 | 3 |
| Damage Reward | |||||
| Normal | Hard | Extreme | |||
| 1,200,000+ | 10 | 1,900,000+ | 20 | 2,750,000+ | 30 |
| 960,000+ | 9 | 1,520,000+ | 18 | 2,200,000+ | 27 |
| 720,000+ | 8 | 1,150,000+ | 16 | 1,650,000+ | 24 |
| 480,000+ | 7 | 760,000+ | 14 | 1,100,000+ | 21 |
| 400,000+ | 6 | 650,000+ | 12 | 950,000+ | 18 |
| 330,000+ | 5 | 530,000+ | 10 | 770,000+ | 15 |
| 260,000+ | 4 | 420,000+ | 8 | 600,000+ | 12 |
| 200,000+ | 3 | 300,000+ | 6 | 450,000+ | 9 |
| 120,000+ | 2 | 200,000+ | 4 | 280,000+ | 6 |