No edit summary Tag: Source edit |
No edit summary Tag: Source edit |
||
| (9 intermediate revisions by 2 users not shown) | |||
| Line 1: | Line 1: | ||
<center><font size="+2">Best Heroes and Team Composition</font> |
<center><font size="+2">Best Heroes and Team Composition</font> |
||
| − | [[File:Demon Kimara feat.jpg]]</center> |
+ | [[File:Demon Kimara feat.jpg|670px]]</center> |
| Line 84: | Line 84: | ||
==Team Composition== |
==Team Composition== |
||
| + | <br> |
||
| + | Standard Set-up:<br /> |
||
'''Damage Dealer / Disable Debuffs / Disable Attack / Healer or Filler Role''' |
'''Damage Dealer / Disable Debuffs / Disable Attack / Healer or Filler Role''' |
||
| Line 90: | Line 92: | ||
<br /> |
<br /> |
||
| + | |||
| + | '''Team Examples:''' |
||
{| style="border: 1px solid black; width: 100%;" |
{| style="border: 1px solid black; width: 100%;" |
||
! width="12%" style="background: #260B06; border: 1px solid black;" |<font color="white">Standard Team</font> |
! width="12%" style="background: #260B06; border: 1px solid black;" |<font color="white">Standard Team</font> |
||
! width="12%" style="background: #260B06; border: 1px solid black;" |[[File:Beren.png|link=Blue Eren|70x70px]] |
! width="12%" style="background: #260B06; border: 1px solid black;" |[[File:Beren.png|link=Blue Eren|70x70px]] |
||
| − | ! width="12%" style="background: #260B06; border: 1px solid black;" |[[File: |
+ | ! width="12%" style="background: #260B06; border: 1px solid black;" |[[File:Rslater.png|link=Red Slater|75x75px]] |
! width="12%" style="background: #260B06; border: 1px solid black;" |[[File:Rgowther.png|link=Red Gowther|75x75px]] |
! width="12%" style="background: #260B06; border: 1px solid black;" |[[File:Rgowther.png|link=Red Gowther|75x75px]] |
||
! width="12%" style="background: #260B06; border: 1px solid black;" |[[File:Blilia.png|link=Blue Lillia|75x75px]] |
! width="12%" style="background: #260B06; border: 1px solid black;" |[[File:Blilia.png|link=Blue Lillia|75x75px]] |
||
| Line 107: | Line 111: | ||
! width="12%" style="background: #260B06; border: 1px solid black;" |<font color="white">Full Damage Team</font> |
! width="12%" style="background: #260B06; border: 1px solid black;" |<font color="white">Full Damage Team</font> |
||
! width="12%" style="background: #260B06; border: 1px solid black;" |[[File:Beren.png|link=Blue Eren|70x70px]] |
! width="12%" style="background: #260B06; border: 1px solid black;" |[[File:Beren.png|link=Blue Eren|70x70px]] |
||
| − | ! width="12%" style="background: #260B06; border: 1px solid black;" |[[File: |
+ | ! width="12%" style="background: #260B06; border: 1px solid black;" |[[File:Rslater.png|link=Red Slater|75x75px]] |
! width="12%" style="background: #260B06; border: 1px solid black;" |[[File:Rgowther.png|link=Red Gowther|75x75px]] |
! width="12%" style="background: #260B06; border: 1px solid black;" |[[File:Rgowther.png|link=Red Gowther|75x75px]] |
||
! width="12%" style="background: #260B06; border: 1px solid black;" |[[File:Bdmeliodas.png|link=Blue Demon Meliodas|75x75px]] |
! width="12%" style="background: #260B06; border: 1px solid black;" |[[File:Bdmeliodas.png|link=Blue Demon Meliodas|75x75px]] |
||
| Line 114: | Line 118: | ||
! width="12%" style="background: #260B06; border: 1px solid black;" |<font color="white">Beginner Friendly Team</font> |
! width="12%" style="background: #260B06; border: 1px solid black;" |<font color="white">Beginner Friendly Team</font> |
||
! width="12%" style="background: #260B06; border: 1px solid black;" |[[File:Bmeliodas.png|link=Blue Meliodas|75x75px]] |
! width="12%" style="background: #260B06; border: 1px solid black;" |[[File:Bmeliodas.png|link=Blue Meliodas|75x75px]] |
||
| − | ! width="12%" style="background: #260B06; border: 1px solid black;" |[[File: |
+ | ! width="12%" style="background: #260B06; border: 1px solid black;" |[[File:Rslater.png|link=Red Slater|75x75px]] |
! width="12%" style="background: #260B06; border: 1px solid black;" |[[File:Bdiane.png|link=Blue Giant Diane|75x75px]] |
! width="12%" style="background: #260B06; border: 1px solid black;" |[[File:Bdiane.png|link=Blue Giant Diane|75x75px]] |
||
! width="12%" style="background: #260B06; border: 1px solid black;" |[[File:Relizabeth.png|link=Red Elizabeth|75x75px]] |
! width="12%" style="background: #260B06; border: 1px solid black;" |[[File:Relizabeth.png|link=Red Elizabeth|75x75px]] |
||
| Line 129: | Line 133: | ||
Fragments are also obtained from clearing the stages. These can be exchanged for Growth materials in the shop. |
Fragments are also obtained from clearing the stages. These can be exchanged for Growth materials in the shop. |
||
| ⚫ | |||
| ⚫ | |||
| ⚫ | |||
| ⚫ | |||
<br /> |
<br /> |
||
| Line 138: | Line 142: | ||
{| class="wikitable" style="text-align: center" |
{| class="wikitable" style="text-align: center" |
||
| |
| |
||
| ⚫ | |||
| colspan="2" |'''Hard''' |
| colspan="2" |'''Hard''' |
||
| colspan="2" |'''Extreme''' |
| colspan="2" |'''Extreme''' |
||
| ⚫ | |||
|- |
|- |
||
|Level |
|Level |
||
| Line 197: | Line 201: | ||
*'''Phase 1''': Every 4 turns, a Buff is applied which increases the mace’s damage. '''When the mace gets bigger, it becomes overheated and cannot move.''' |
*'''Phase 1''': Every 4 turns, a Buff is applied which increases the mace’s damage. '''When the mace gets bigger, it becomes overheated and cannot move.''' |
||
*'''Phase 2''': Every 3 turns, a Buff is applied which increases the mace’s damage. '''The mace becomes bigger but does not become overheated.''' |
*'''Phase 2''': Every 3 turns, a Buff is applied which increases the mace’s damage. '''The mace becomes bigger but does not become overheated.''' |
||
| + | [[Category:Demon Kimara]] |
||
| + | [[Category:Guides]] |
||
| + | [[Category:Demon]] |
||
| + | [[Category:Event Boss]] |
||
Revision as of 18:41, 28 January 2021
The Demon Kimara is a brand new original demon from the series’ creator, Nakaba Suzuki. By participating in this event daily, users can collect fragments that are used to exchange for growth materials in the Exchange Shop. It includes a Part 2 Guaranteed SSR Ticket, Evolution Pendants, Awakening Stones, Anvils, Treasure Chests, and Limit Break materials!
Similar to Death Match demons, event bosses have a core strategy that players should be guided on to lessen the difficulty of clearing the stage. Since the Demon Kimara has limited immunity (only immune to crowd-control such as stun, freeze, and petrify), it is best to utilize heroes that can disable the boss with debuffs.
Here are the best team compositions and heroes that can fill each role effectively.
Best Heroes for Each Role
Disable Debuff

|

|

|
|---|
Red Slater - “Overpower” skill decreases Attack-related stats and disables everything but Attack Skills for 2 turns. Will be able to cancel Kimara’s “Savage Strike”.
Blue Gowther - “Blackout” skill mainly disables debuff skills and gets more effective as the skill rank increases. Also cancels Kimara’s “Savage Strike” skill.
Blue Merlin - “Dark Void Buster” prevents the boss from using debuff attack skills. “Curse Engagement” also decreases skill ranks to mitigate incoming damage.
Disable Attack

|

|

|

|

|
|---|
Red Gowther - while “Invasion Arrow” boosts your allies’ skill rank to increase effectiveness, he can also disable the enemy Attack Skills with his “Arrow Shot”.
Red Diane - her “Sand Whirl” skill can both disable Attack Skills and decrease Defense-related stats, allowing your team to do more damage when the boss is debuffed.
Blue Giant Diane - good for starters without a Red Gowther as she can be acquired after completing Chapter 4 of the Main Story. Her “Rush Rock” skill can disable Attack Skills at ranks 2 and 3. Moreover, she can be your second damage dealer for the team.
Red Elizabeth - also good for starters who need the disable debuff and constant healing for additional sustain. Her “Slide Serve” skill disables Attack Skills at ranks 2 and 3.
Blue Weinheidt - provides additional damage boost with his “Sniper” unique ability, at the same time disables Attack Skills with his “Flash Arrow” at ranks 2 and 3.
Damage Dealer

|

|

|

|

|
|---|
Blue Eren - as a farmable 6/6 hero during the Attack on Titan collaboration event, his ultimate and attack skills hit hard due to type advantage. He can also self-buff to increase basic stats and deal more damage.
Blue Demon Meliodas - if you are using Blue Lillia or Blue Weinheidt in the team who can boost the team’s pierce rate, Blue Demon Meliodas can contribute more damage from his “Enchant Hellblaze”. In addition, his ultimate with Weak Point effect inflicts 3x damage against debuffed enemies.
Blue Arthur - an alternative damage dealer whose ultimate is easy to upgrade being an SR hero. He can deal intensified attacks with his “Sharp Blade” the more Ultimate Move Gauge orbs the boss has.
Blue Hawk & Elizabeth - one of the safest choices due to her “Solidify” skill, allowing her to survive longer than most damage dealers. Moreover, her skills inflict additional damage due to Amplify and Charge effects.
Blue Diane - she can be used strategically to fight the boss by interrupting its debuff skills while inflicting a respectable amount of damage.
Healers

|

|

|
|---|
Blue Lillia - Highly recommended especially with Blue Demon Meliodas on the team. She can help with healing and stopping the boss from using his ultimate.
Blue King - Although the boss is immune to petrify, using Blue King for starters is a viable option because he can heal and provide decent damage due to type advantage.
Blue Princess Elizabeth - She can also disable the boss from using debuff skills, at the same time provide healing with her ultimate and “Brilliant Protection” skill at ranks 2 and 3.
Team Composition
Standard Set-up:
Damage Dealer / Disable Debuffs / Disable Attack / Healer or Filler Role
Attack and debuff disablers of any hero type are essential in order to steal turns, forcing the boss to skip his attacks. Meanwhile, damage dealers are recommended to be Speed-type heroes with high ultimate damage, but it can be any hero you’ve already built as long as it has high attack stats. Lastly, the filler slot can be assigned to any hero that can bring utility or sustain, and can even be a second damage dealer for those with high team CC.
Team Examples:
| Standard Team |
|
|
|
|
|---|
| Damage + Healer Team |
|
|
|
|
|---|
| Full Damage Team |
|
|
|
|
|---|
| Beginner Friendly Team | 
|
|
|
|
|---|
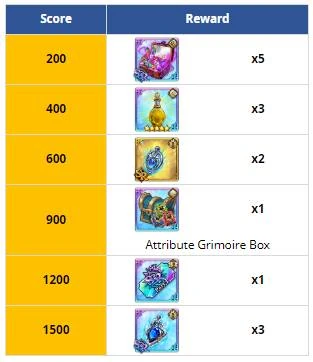
Maximizing your Score
There are 2 ways to get an event score. First is by defeating the boss, and the second is fulfilling the applied mission. While clearing the stage is a good achievement in itself, you want to maximize your score by completing the mission as well, giving you twice as much score in total. Remember, you are only allowed to clear 3 times a day and you need to achieve a high total score to get milestone rewards.
Exchange Shop
Fragments are also obtained from clearing the stages. These can be exchanged for Growth materials in the shop.
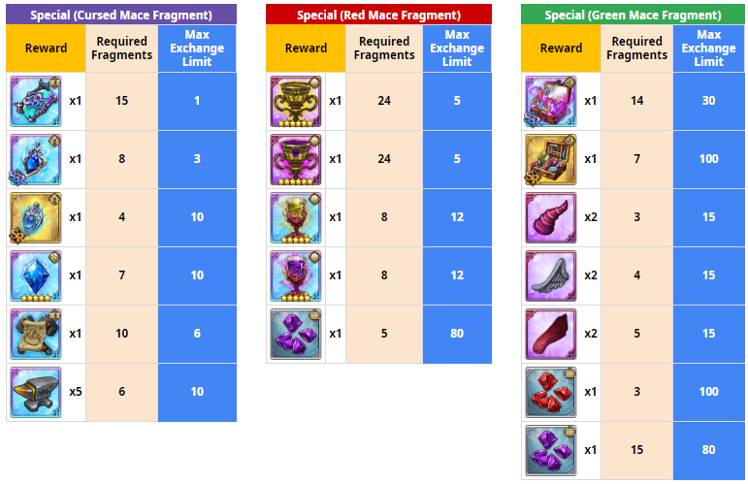
Don’t forget to log-in daily from August 6-11 and get Red and Cursed Mace Fragments! Details of this log-in event can be found here.
About the Boss
| Hard | Extreme | Hell | ||||
| Level | 100 | 120 | 140 | |||
| Attribute | ||||||
| CC | 80,000 | 100,000 | 120,000 | |||
| Phase 1 | Phase 2 | Phase 1 | Phase 2 | Phase 1 | Phase 2 | |
| Attack | 6,540 | 7,848 | 9,030 | 10,836 | 10,430 | 12,516 |
| Defense | 4,147 | 4,992 | 5,306 | 5,944 | 7,024 | 7,881 |
| HP | 144,700 | 158,600 | 238,980 | 261,240 | 314,720 | 364,820 |
Notable Skills and Unique Abilities
- Immune to Stun / Petrify / Freeze / Coerce.
- Increased damage taken from Humans by 30%.
- Skill Effects: Poison, Increased damage to poisoned enemies by 50%, Prevents Ultimate Move Gauges from filling up, Can only be affected by 1 stack of Attack Disable or Debuff Disable, Disables Recovery Skills.
- Phase 1: Every 4 turns, a Buff is applied which increases the mace’s damage. When the mace gets bigger, it becomes overheated and cannot move.
- Phase 2: Every 3 turns, a Buff is applied which increases the mace’s damage. The mace becomes bigger but does not become overheated.